Showing posts with label Hair Color. Show all posts

Thursday, November 2, 2017

eZn Real Milk Hair Color

Hello lovelies,

so I was bored, one thing about me is that, I could never be bored or something about to happen.

I'm tired that my hair keep being tangled, severely damaged due to the bleach and curling chemicals, so I chop it off. I cut my own hair yesterday. With a bit of knowledge on what kind of hair style I want and how to do it from methods I know are done in Australia. They (the hair stylist) cut the hair after being tied, it helps getting an even length all over. Without trimming them down, I get the volume that I desire, so it is kinda a thing for me now to cut my own hair.

If you don't feel confident enough to do it? Don't! Better go to your trusted hair salon.

As the story goes, I imagine I need a new color too as the previous one have been washed out, checking out my collection, I still have some from Korea, this one looks appetizing, hence I choose eZn Real Milk Hair Color in Sweet Rose.

-*-


The product comes as a DIY hair color at home, it comes in several shades like brown, apricot, and ash. On their website, which is all Korean, it was said that the product contains oat that protects the hair, perilla leaf that shield the scalp and even have UV block keeps the hair color true.

So what does the milk refers to? They said it contains real milk to that gives nutrition to the hair, plus the texture that milky like, which I think a bit overrated since the texture is still too creamy to be called a milk.

Inside the milk carton packaging is impressive, they gave us not just the cream and developer, the hair pack for after use, latex glove and here it is, a plastic that will cover the neck and clothes. Hooray!! No more looking for an ugly shirt to ruined by.

-*-


The details are all in Korean, the key is like almost any hair coloring product, pour the one in the tube to the one in the cute milk bottle. Close it tight and shake around 20-30 times until thoroughly mixed. Use the lid with a tip for the hair for easy squeezing and application. As usual, use on dry (unwashed) hair immediately once the solution is mixed. Use the plastic cover and gloves before starting to applying. My tips would be, brush your hair before applying for a smoother process.

-*-

You may add some nutritive oils for hair into the mixture, something that I forgot to do and regretting it now. It helps super dry hair to at least survive.

Put the mixture all over the hair section by section, don't forget to gently massage it in between hair for an even application. After the mixture is finished, around my hair length (longer and thicker hair needs more than 1 package), do wait for around 30 minutes or so. I waited around 45 minutes and I can feel that the mixture becomes hot on my hair. Then after the times is up, rinse everything off and use the hair pack. I leave the hair pack on my hair around 5 minutes. But it was no use, my hair still feel so dry, I think it's almost like using a colorant mixed with bleach, it felt that dry.

I have trouble brushing my hair while drying it.

-*-


How about the color? Hmm, I've seen better, like L'Oreal is definitely better (oops sorry for the hard truth) but it really is. The formula coats more, shines more and I can happily brush my hair afterwards, this one, despite of the milk, oat, bla bla bla, my hair is dryer than before (cries out loud).

So perhaps, if you have virgin hair, eZn Real Milk Hair Color can more easily changed the hair color since I think there's some bleach here, it helps the hair lighten faster than hair colorant that focusing on the color and shine, since bleach means you'll loose the shines for sure and the consistency of the hair colorant need to be better, thicker, and fuller in color, the intensity is less here. But if this is the color you'll looking for, go ahead!

-*-


Still, I doubt that the color can stay long and I'm obviously worry about the dryness, from now, I'll focus on using treatments to help boost the hair condition that shines and moist.

Overall,

love the plastic cover and latex gloves, loves the decoration and colors of the packaging and bottles, but the actual purpose of the product could be better, a lot better. Shine and glossiness need to be increased by far.

Monday, September 18, 2017

Moeta Pop Devil Color Treatment Ampoule


Hello lovelies,

I found these babies by accident during a trip to Seoul. They are sold in one of subways underground stores and I didn't know that they are that good nor famous.

Apparently, they are pretty good, but I only bought two since I didn't aware, I got mine in soft pink and aquamarine.

-*-


The official shade name of the shade is Aqua Blue and Pink.

-*-


[MOETA] POP DEDEVIL COLOR TREATMENT - TOV12

They look super pretty right?! And as seen, it works best on bleached hair.

-*-


Almost all  the details in Korean, the basic how to is in English (glad isn't it?!) but the lady that sold me these babies share her tips, to leave them on longer than 15 minutes for a brighter and deeper hue.

-*-


Look carefully, it's 30 ml, I don't really pay attention as it clearly too little for the whole hair or even half, or even third... let's just say 30 ml is only for a handful and not a bit more.

-*-

The one I'm using for this post review is the pink one since my hair is already half white like a snow queen.

-*-


[MOETA] POP DEDEVIL COLOR TREATMENT - TOV12


I simply applied on my hair after being shampoo and toweled dry. So please do remember as it is too little for my whole hair, so it's only about a quarter of my whole hair. More like on the ends.

-*-


Here are the results on using the pink, looks really nice and many compliments me as having a cotton candy hair :D

The product is like a conditioner, milky pink, so the color is not bright pink like the result, it's more like baby pink. So does the Aqua Blue, the color of the cream is milky blue. The texture is like gel cream and not totally cream as in thick. They were light and like, well, conditioner.

The hair doesn't feel dry and taut, which is perhaps the benefits in using the product, all I wish is that I want some more please, I should've buy some more, like perhaps 5 tube for the whole head hair.

-*-


Conclusions:

In terms of texture and finish on the hair is wonderful as they don't made my hair dry, but in terms of too little inside their tube is really too less, I need like 100ml at least for a satisfying result, but for those who wants a rainbow colored hair with many different colors probably happy with the tiny tube.

Friday, July 7, 2017

BeautyLabo Hair Color


Hello lovelies,

how are you? I hope everyone is well and happy. I have been through so many things for these past few weeks, from getting iLasik, kidney stone, to holiday and everything in between. It's like a roller coaster ride lately and been to many ups and downs. While so, some of my reviews have to be postpone, sorry for the delays, I hope you understand.

After getting things sort out, this is the first review I can do from the long hiatus, it's a hair color from Beauty Labo with a collaboration with Kawaii Beauty Japan.

-*-


The collection consist of fashion colors that are young, fresh and hips. They are from Japan, so the quality and practicality definitely well proven. Contain Almond and Coconut Oils that are known to be good for the hair, especially in making them shiny and smooth.

Inside the box, there's the cream and developer, plus some details of information and plastic gloves. The product is easy to be applied by hands and mine is Apricot Candy.

You can easily choose other colors such as Natural Black, Dark Brown, Natural Blonde, Pure Beige, Raspberry Pink, or mine (Apricot Candy).

-*-


How to prepare:

Simply open sachet and put it inside the bottle where the developer and cream can be mixed together as a hair color formula. Shake them well after closing the lid.

At first the color are still white with yellowish tone, after a while mine turns into this purple creamy formula, this is the normal shade of formula for the color with a reddish tone.

-*-


It is always best to color the hair when it is on it's 'dirty' condition. Dirty as in haven't been washed for at least 24 hours, some people even said the longer the better, but I think if it's too long and the hair is too dirty, it will create some problems too. Like if the hair is too oily, the formula will not be able to work properly. So 24-48 hours should be good enough, and if your hair is really damaged (like mine) do use a leave in conditioner on the ends of the hair to help with extra protection for the hair.

After making sure that the hair is ready for coloring (brushed and you have worn your worst clothing where you won't mind it getting stained), use the gloves and petroleum jelly on hair lines and the side of the ears that might get some colorant. I use some on my neck too. The petroleum jelly helps prevent staining and all I need is wiped it off if the colors get on to it.

-*-


Afterwards, I parted my hair into sections, color per section starts from the back, all the way to the front. One package is enough for my medium length hair. The formula is easy to be spread all over the hair, using a wide tooth comb also helps making sure all the parts are getting some colors.

I waited around 30-40 minutes for the color to fully developed. I rinsed them off afterwards with running water all the way until the water turns clears. At first it was really thick and rather stiff. Add a bit of warm water and massage the hair off, it helps the hair too to get untangled.

Use a lot of conditioner or hair mask for colored hair afterwards if your hair is as damaged as mine so the hair can stay smooth and soft. Dry as usual and admire the new hair color.

-*-


Above is my before hair color, dull and faded. Below image is the after, the hair regain it's color again, bright and beautiful. I must say, Candy Apricot shade create a brighter hue for my skin tone. 

The coconut and almond oil does help my hair to appear better, if I continue to took care of my hair properly, I can maintained the color and hair condition for the best. Healthy hair definitely looks prettier, they'll shine and stronger too.

-*-


Soon after, I went to Bali for a few days, I swam and enjoy my days under the sun, the color stays, even with that many washes. I'm happy with the result, the color not easily worn out and there's still shine on my hair.

I did some terrible things by having my hair permed and bleached in such a short period, they didn't have time to heal nor survived, hence the color on the part where the hair is severely broken looses the color faster than the rest (healthier part).

-*-


Overall,

Beautylabo Hair Color provide a fashion color with a vivid and long lasting effect that suits our skin tone as the shades are gorgeous and perfect for a trend setter. The fresh tone gave me a younger looking and made me feels good about myself.

The product is very easy to be used at home without expertise and as long as we read the instruction and details thoroughly the chance to fail is near impossible.

Thank you so much Kawaii Beauty Japan and Beautylabo for the opportunity to review Candy Apricot, see you again soon!!

Monday, October 10, 2016

Hairchalk [International G I V E A W A Y]

Hello lovelies,

who loves changing their hair color all the time, and I really meant all..the..time. Like every single event, every single day, but really can't commit or doesn't feels like going through the chemical process?

Well, here's your answer, hair chalks.

They are not 'new' definitely in the business, many people has try them before and comes in several ways, brands, methods, and so on.

But Hairchalk.co comes with many colors and options that becoming a trend. Do check out http://www.hairchalk.co/ for sure.

-*-


I can be timid, and try a few colors on my hair strands. Like using the purple and red as stripes. Using the chalks on some areas only.

Before going further, let's see the details provided by Hairchalk.co on how to use it.

-*-


Or, you can make a mixture the chalk in the water, and use the spray bottle to apply the color. You can also check out @Hairchalkco on instagram as they sometime share tips in using their products.

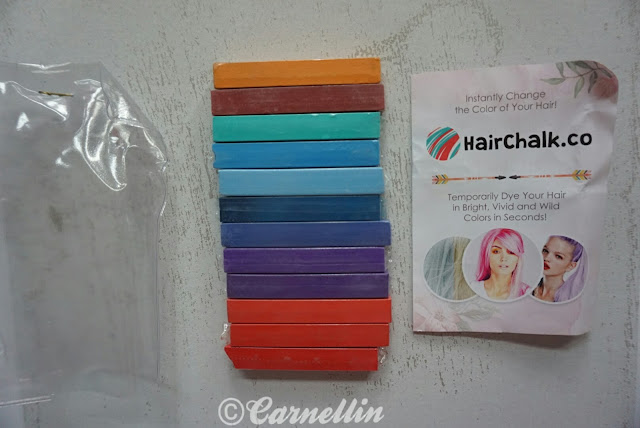
And mine is Independence Red Blue Ombre a 12 chalks set.

And it was not easy, I need some practice in using the product. The color is surely bold and the vivid, but it's still chalk and it since it was made to be used wet and when it's get dry the hair got all tangled up.

-*-

So my tips would be, apply on the hair that is cleaned, dry and already use some hair essence, especially when your hair is already chemically damaged like mine, it is already so dry and brittle.

Use the chalk when wet, apply on a combed hair section by section. As the wet chalk become like a sticky paste, left it be until completely dry, before combing them again. And be careful, these chalks are a mess, it will left mess everywhere, I prefer doing it outdoor.

Cleaning them is easy, just shampoo the hair and use plenty of hair mask or conditioner afterwards to replace the moisture back into the hair.

-*-


Does the hassle worth? Seeing the final result, yes! It covers hair that is dark to of course bright and bleached. It has the ability to transform the hair color instantly. The process took around 15-30 minutes for the result as seen above, so it was pretty fast.

Now, for you who are curious and would like to try, you can join the giveaway and win yourself a set or a product from Hairchalk.co

There will be one winner who gets to choose one product from the shop. It could be one set of 12 OR 1 set of 6 OR a hair chalk pad. The giveaway will run for two weeks. Anyone can gain entries by following Hairchalk.co social media profiles (instagram @Hairchalkco) and mine (@Carnellin).

Do follow me on instagram to read more details.

Thank you Hairchalk.co

Monday, September 19, 2016

L'Oréal Excellence Fashion Sparkling Visible Color in Intense Spicy Red


Hi lovelies,

yes, my hair is red now, it's spicy red and pretty intense too.

I recently dyed my hair using L'Oreal Excellence Fashion Sparkling Visible Color in Intense Spicy Red. It was one of the product I've bought in Malaysia since the tone is not available in Indonesia. And since I've bleached my hair before, the color just blend into my hair without any problem and the shade are so vivid on a bleached hair like mine.

-*-


I've dyed them myself at home, I've post a short clip of my before and after on my instagram account @Carnellin, nowadays updating on instagram is so easy and fast too, I always make live updates there.

Now, back to the product.
What are the things inside the package? There's developer, color mixture, gloves, pre coloring care, and after coloring care.

The first thing that has to be done is using pre coloring care on a dry (and preferably dirty, haven't been wash for at least a day) hair. Apply all over from the mid length to the ends. Pay attention on the ends more as the farther the hair from the roots, the less nourished it is and dryer it will be, hence need more help from the pre-coloring care that looks like a thick creamy conditioner.

Mix the color mixture in the tube into the bottle where the developer is. Close the lid tight and mix everything vigorously making sure they are ready to be used, shaking around 5 minutes all over the direction should do the trick. Open the lid and change into the brush lid provided. Don't wait up and start distributing on the hair avoiding the roots.

Clips, hair comb, mirrors (lots of them), newspaper to cover the floor, towels for the neck, everything needed for the process is surely helpful. The more you do it, the more 'articulate' you'll be with the whole DIY. The key is to:
1. Brush the hair before coloring.
2. Use hair clips on 4 different section as it helps making sure the colorant is distributed evenly.
3. Several mirrors on several different angle from back to sides and front help the eyes to get 360 degree vision.
4. Always calm down and ready for any surprise, as long as there's no irritation occur (burning sensation), you're fine.
5. In the salon, the stylist always leave the colorant develop longer on the hair than instructed, but not necessarily means really long time, let's say 30 minutes, make it into 45 minutes, or so.
If you're not sure, juts keep checking your hair and see whether the color are 'in' and the desired color are in your hair.
6. Protection, protection, protection. Protect your clothes from the colorant, your skin (including scalp if possible), ear, forehead and neck are the common victims, and use plenty of masks after coloring the hair for at least a month to seal the moisture in.

-*-


After waiting for around 45 minutes or perhaps almost an hour, I rinse my hair and oh my, it was bleeding so bad, just like using manic panic, the color runs endlessly. And I waited until it clears off and it never did. It is almost a week since I dyed my hair and it still bleed.

The towels are all stained and my neck too. This is indeed fashion color since it goes everywhere. The color is so pretty and vivid but it does bleeds.

-*-


Overall,

A great hair color with intense color. Very easy to be used and the care is wonderful, from the pre colorant to after care (conditioner) that I could use for around 4 days (for medium length hair) as a conditioner that made my hair so smooth and soft to the ability to stay true. The only thing that becomes the problem that it bleeds pretty much everything the hair touches.

So in the end, if you're okay with the stain, go with the color. Remember that this shade is possible after the hair is bleached.

Wednesday, August 17, 2016

Hair Treatment at Hair Lounge by Ryoji Sakate


Hello lovelies,

my hair was dyed around a month ago, since then I have to constantly color my hair since I'm using hair colorant that are not permanent. They are acid and known to made the hair condition better with nutrients and vitamins. However the color only last for around 1-2 weeks.

-*-


So, I'm back to Ryoji Sakate and have my hair manicured plus I'm getting a hair treatment too, known to make my super dry hair smooth, shines and so soft.

-*-


Using L'Oreal Nuancelle in Purple, the whole process took around 60-90 minutes from washing, application and waiting time plus drying too. The hair treatment only took less than 15 minutes where the product is used less than a minute with a result I love.

It was amazing, like my hair is healthy again. I can't really comb my hair since being bleached, now, I can use the finest brush and no tangle could be found. And the shine? Irresistible.

-*-


Do visit the salon for more information, they treatments for the hair and scalp. You can find one you need. Hair treatment can be done once a month and head spa (for the scalp) is around once every two weeks.

Friday, July 22, 2016

Hair Lounge by Ryoji Sakate

Hello lovelies,

As my hair goes weary with the blue green manic panic and hair manicure. And the outdated style which need major reconstruction, finally, I went to Hair Lounge by Ryoji Sakate. A place where Japanese hair stylists and trends meet.

-*-


The location is at Senopati and right above some restaurants. The place is decorated minimalism, it is a huge trend in Japan and many Japanese hair salon also embrace this idea hence they look kinda similar. I've been to a Japanese hair salon since 10 years ago when I was in Singapore.

Everything is made by appointment, so please do call them in advance and set up a date, plus information for what kind of service you're looking for as preparation will be made for efficiency and a better time management.

I was scheduled at 4 pm and went in when Takeshi is ready around 4.15 pm. I want a fresh cut, so a medium length bob is my choice. He cuts everything nicely and with the similar techniques done in Japan. The whole process took around 90 minutes, we keep consulting, he asked me what I want, Takeshi gaves input and so on, until the desired length and style is achieved.

-*-


Now, as the cut has been made, it's time to start with the next step of my makeover.

Coloring.

I want a lavender colored hair, as a fan of that particular flower, I want my hair to look like it, plus with a hint of pinks. 

-*-


Since my hair is colored with many process and stuffs, Shierley decided to start with bleaching and the colored the hair in suing purple and pink in stripes.

The result was amazing, my hair looks like grape with peaches.

The process took around 3 hours but it just worth the time consumed making this lovely colors.

The bleach feels sharp at the nose and the color made the scalp feels hot. But it's bearable, and last only a while.

-*-


The studio is dimmed and the lighting is yellowish.

During the day light and outdoor the color is so fresh and young.


-*-


The curls are made using thongs that will definitely gone after the first wash. But the stye and color last, at least for the style. The color on the other hand, will last approximately 2-3 months.

-*-


Thank you so much!! See you again soon.


Sunday, May 22, 2016

Between Pravana, Manic Panic, and Hair Manicure

Hello lovelies,

I've been experimenting with my hair again lately.

Since around high school, I've dyed my hair red, and then during college days, series of brown, light brown, highlights, dark blonde has been on and off for years. I've dyed my hair blue and purple too, but never to the phase that so bold and vivid. It was more like black with a ray of blue when the sun hits the hair, or deep violet purple.

It was on my twenties that I first try coloring my hair brightly, red is my option, and then I get a hair manicure and it opens up possibilities that colored hair can also shines so beautifully.

I'm not just talking about coloring your hair using those home kit product on your virgin hair, it was more like bleaching to the level where if you go any higher, your hair will breaks off.

-*-


I've been dying (matter of speech) to try on manic panic, they have the most intense color I know, and then I met Pravana as well. Shades like rainbow and not just a hint, but bold colorful rainbow. Also, those lovely pastels. It was really difficult to get the pastel, your hair has to be really strong for the bleach to really run through your hair, completely removing any pigment left, to be become white as a new canvas, ready to be paint.

Imagine, cotton candy, baby blue, milky yellow or cloudy lavender, it's the shades that need a really clean paper hair.

I'm not really a fan of a total pastel, and I don't think my hair can take it as well, so I get Pravana 40% and bleach my hair as instructed. And when I see that it is already so coarse, I stopped and didn't continue with 20% for a lighter shade.

At first I've dyed mine using Pink Flamingo, I love it but the color almost runs out within a month. It didn't stained anywhere like Rockability Blue (it was nuts, stain everywhere!!!) nor like Atomic Turquoise. I think Pink Flamingo is the best.

-*-


As seen above, my hair looks so fry, like super duper dry that I can get electric charge thanks to the friction.

I love the color but hate the dryness.

So I remember hair manicure, asking around from salon to salon, it is still as expensive as before, around Rp. 800.000 for my length. I need it so bad but since I bleach and dyed my hair by myself, why not do the hair manicure as well.

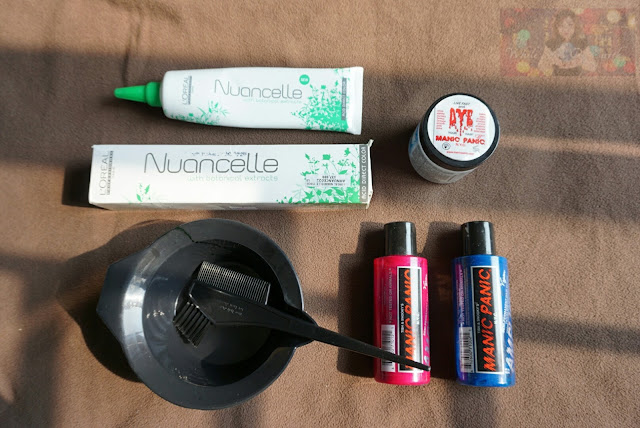
So I bought some from Tokopedia and choose green and purple. It was from L'Oreal called Nuancelle. They are actually comes in many shades, but most shops only sell red, brown and clear (like it was the most sought after). If you're not sure about your hair color or doesn't want to be change, use the clear one as it is perfect for pastel colored hair.

What does it do?

It is actually a deep treatment that add a hint of color to the very damaged hair and mostly about the gloss. Don't try using it as a hair colorant as the color is fading on each wash, oh right, like manic panic too, but use hair manicure products to get that awful state back to looking good.

A lot of salon has this kind of treatment, there are some Korean salon in Indonesia that have their own brand of hair manicure (not L'Oreal).

I saw on Habb and they do have many pretty pastel shades on their hair manicure section. 

-*-


How to use a hair manicure?

Clean your hair first using a shampoo, then towel dry the hair and apply the formula all over the hair avoiding scalp, So never let the formula touches the scalp. Just like coloring the hair, I prefer using a brush instead of a coloring brush like shown about, it was too thin and when the hair is wet, it pulls more than helps applying.

Leave them on by using a cling wrap (like the one for food) just wrap your hair like using a shower cap and it is best to heat it up a bit. I'm sitting near a hot water or using a blow dryer in a hot mode.

Around 20 minutes and then open the cling wrap. Let it stay in room temperature for 5 minutes before rinsing everything off. It was like a series of endless colored water and it will still stain your towel for days and days. Clear is best for sure, I'm getting them in clear once I've finished with these two.

This time, I only use half of the container, I want to use all but half of it is suffice. A tube cost me around 125.000 Rupiah, so the price is definitely cheaper than in salon. But in a hair salon, you'll get professional help plus the application must be better and far more even.  I'm using two mirrors, one in my right to the back and the other in front. Use your favorite angle to get them done. Always brush your hair before coloring or applying hair manicure, it helps a lot!

Since the shade I'm choosing is green and not turquoise like my hair color, it changes it shade to what it is below.

-*_


Look at my hair now, it is not as dry as before hair treatment. On all the picture here, both images are taken after shower and just drying my hair using a hair dryer. So the condition are clearly different one to another.

The differences are visible, touchable and definitely I can manage my hair better than before.

People I met are shocked looking at my hair now as it is not as dry as it was. Like they were confuse, the more I colored my hair, the less dry it become, it was hair manicure for sure.

-*-

There are pros and cons in all the things I've done at home (from bleaching, coloring with manic panic, and then hair manicure), especially bleaching since when getting a professional help, they know until which stage the hair can 'survive' the bleach. Bleach will always damaged your hair, made them dryer and definitely ruins you if you overuse it. Same goes with coloring and hair manicure, getting help means they should do a better job than you alone, so it means a more 'artistic' and even application.

The thing is, when you done things at home, everything is in your hands. Never let those chemicals touches the scalp. Look what it did to the hair, you don't want any of that to get into your system than it already did. If it hurts you on the scalp, don't do it, it's not worth it and letting anyone hurts you like that plus you have to pay for them, it's a big no no.

Once I had my hair manicure at a famous salon, and the stylist accidentally dripped some on my scalp, he tried to removed it like crazy and bleed my scalp. It was very painful.

I also bleach my hair once and the stylist (other place, other time) apply them on my scalp, it was also very painful.

Let's just say I have pretty bad experience with salons. So now, I'm only went to places I can really trust. I'm scared to get hurt again, physically and financially.

-*_


So, if you want to try DIY your hair, always read, read and read the manual, instruction and details needed. Side effects and cons should be fully studied before hand.

Tips from me, relax! It always took longer than you think. Prepare everything well and go easy on your self, don't be to tense. There are tons of brands, colors and types you could choose, get the one that matches your lifestyle.

Most hair colorant are best to be used on dry dirty hair as in let your hair be unwashed at least 24 hours.
Manic panic need to be applied on dry and cleaned hair, so wash your hair and then dry them completely using a hair dryer and then apply the product.
Hair manicure is applied on a cleaned and semi dry hair, wash your hair cleaned and then use a towel, when there's no more drips, the product can be applied.

For girls, never get your hair done during PMS and during your period, it hurts you more. I learned this the hard way.

Hope it helps <3 br="">

Saturday, January 30, 2016

DeXe Hair Color Chalk


Hello lovelies,

I love changing my hair color (no surprise here) and sometime it does drives my hair insane, they become so dry, brittle and unavoidable breakage after several chemical process, hence, a chalk like this could give me an option of colors without permanently damaging my hair.

-*-


Dexe hair color chalk is a  wipe on, wipe off coloring product! It's the creation of instant highlights, the color can stay on your hair until it is wahsed with normal shampoo. There are 12 colors are available to meer different styles, different colors can be applied on hair to highlight your hair. Besides, the finest ingredients makes it never harm your hair.
Dexe color chalk is the best temporary hair color product which can  gives you crazy hair at a Friday night ,and  can be easily wiped off in  the Monday morning.

-*-

Using the handle, grip it, put the hair between the tong, press them together and gently rub it downwards on the dry hair. The chalk will color the hair as it goes and I think it is best to do it little by little on a perfectly brushed hair so it'll glide more evenly and easier too.

Since my hair is pretty much coarse, the chalk sticks on the damaged part better. And then I just have to brush it along the way.

-*-


The packaging does mentioned to use a towel or anything to cover the shoulder and neck as there are many drops of chalks here and there, plus pink is a pretty much obvious color.

-*-


As seen above, after being brush the chalk will settle lesser and my white brush will become pink. So imagine it drops on the clothes, everything it touches will become pink, so do use something to cover it up and then after being brush and the leftovers are out, the color will set.

-*-


And it will last until it touches water or being rubbed intentionally.

-*-


Overall, hair chalk from DeXe offers a temporary hair color without making a commitment. The chalk itself is drying, so do care for the hair afterwards by cleaning it real good, add some mask or conditioner to get the hydration back.

Compared to other chalk, it is kinda the same, it's the tong that made a difference.


SainBelle Salon


Hello lovelies,

this is SainBelle salon at Mall Taman Anggrek, located at the Ground Floor, the newly opened salon boast on health and beauty principle.

-*-


To promote their Grand Opening, the salon is having some promotion, do check them out and visit when you're nearby.

-*-


I went there a few days ago to get my hair done. It's been a while and my hair need a constant 'update' so I opted for a hair color and offered to get a hair cut as well. I want a long bob, but still in a range that is safe for my chubby face (hint for beauty clinics to offer me threadlift).

-*-


The hair color was done by Mira and the hair cut is by Babe. They are really good in what they do. Mira was experienced in hair coloring for sure, she knows what happen when she put light blonde to my burgundy colored hair and the process also convenient.

She already told me that this is the best result I can get without the need of using a bleach. She understand the chemicals of the products really well and explain it to me in a very comfortable way possible.

Little that many customer know, upon hair coloring, do pay attention on the hair condition before the coloring.
1. Is the hair strong enough to be colored or bleach?
2. When is the last time the hair went through a process and what kind is it?
3. For women it is always best to chemically process your hair when not in period or pms.
4. For anyone not to wash their hair at least 24 hours before chemical process.
and last but not least, take your time consulting with the stylist before making any decision, including possible allergic reaction to whether the particular style suits your needs and well for me, shape of my face (round aka chubby).

-*-


Around 2 hours, the hair is colored and cut nicely done. I love the final result. The cut is in decent length and the shape suits my frame.

-*-


Thank you so much Mira and Babe, now I'm ready for events.

-*-


See you again soon SainBelle.